
In this tutorial, it is not compulsory you disable your blogger comment form but I will advise you to back up your blogger template before carrying out this installation.
STEP 1: Visit Facebook developer page .
You might be asked to verify your account, choose any of the verification options to complete the verification.
Thereafter you will see a small form, enter your blog name ( you can type any name ).
Then, enter your blog url
Don’t forget to put the “/” sign at the end of your blog url as indicated in the picture below.

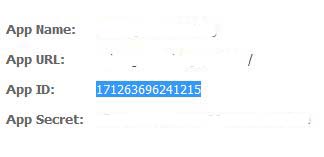
If successful, you should then see a page displaying your application info. Now copy the App ID as indicated in the picture below and save it in a notepad.
STEP 2: Login to you Blogger dashboard and navigate to Layout > Edit HTML and tick the small “Expand Widget Templates” box. Using “CTRL+F“, search for the code <body> OR <body expr:class=’"loading" + data:blog.mobileClass’> and paste the code highlighted below directly under it and save the template.
<div id=”fb-root”></div><script src=”http://connect.facebook.net/en_US/all.js#appId=141084445958514&xfbml=1″></script>
Replace the APPID in the code above with your APP ID provided from Facebook which you copied in Step 1 and save the template.
After adding the code, your code should now look like:

STEP 3: Still in Design/Layout > Edit HTML and tick the small “Expand Widget Templates” box. Using “CTRL+F“, search for the code<data:post.body/> and paste the “comment form code” highlighted below directly under <data:post.body/> and save the template.
<b:if cond=’data:blog.pageType == "item"’>
<p align=’center’><a href=’http://www.ogbongeblog.com’><img alt=” class=’icon-action’ src=’http://2.bp.blogspot.com/_B1aAP3Dld_s/TQMw8AEVE3I/AAAAAAAAAdU/m3jMAe8aMko/s320/commentpix.png’/></a></p>
<fb:comments expr:href=’data:post.url’ numposts=’10’ width=’500’/>
</b:if>
You can adjust the WIDTH too to any size you want (the 500 is ok).
SAVE your template and view one of the POSTS on your blog. You should see the comment form.
NOTE:
In this tutorial, I have used the <b:if cond=’data:blog.pageType == "item"’> conditional tag to restrict the comment form to the post pages. Hence, you might not see it on the Homepage and also on PAGES but you will definitely see it under your blog posts.
If u remove the <b:if cond=’data:blog.pageType == "item"’>conditional tag together with it’s </b:if> closing tag from the comment form code above, then, the form will appear on all pages of your blog and also on the homepage.
That’s all. SAVE your template and view your blog. You should see the comment form.
So, How about the Notifications?
You will need to add some codes to your blog html so you can be receiving facebook notifications and also to be able to moderate the comments.
So, Login to you Blogger dashboard and navigate to Layout > Edit HTMLand tick the small “Expand Widget Templates” box. Using “CTRL+F“, search for the code <b:skin><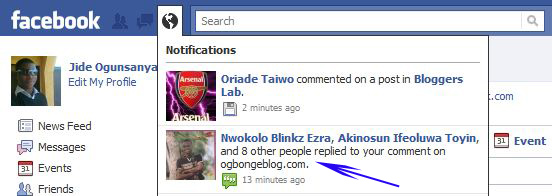
So, How Do I Moderate and Reply to Comments?
Whenever you want to moderate your comments, just go to :http://developers.facebook.com/tools/comments
You can bookmark it for easy access. You can also easily be replying comments from the page.
What If I want to hide Blogger’s comment form?
If you want to Hide the Blogger’s comment form; go to: Settings >Comments > Comments, and mark the Hide radio-button and click on “Save Settings”.

I hope this info helps…
If it works for you, kindly use the comment form to share the link to your blog, so we can check it out.
Connect with me on facebook via www.facebook.com/jideogunsanya
If you don’t seem to get it working, contact me, BUY ME A DRINK and I will install it for you…lol
For more info on the features of the new facebook comment form, check out:
http://www.strictlyonlinebiz.com/blog/top-facebook-comment-box-features/2088/
In my future posts, I will share with you, how you can add the Facebook “Recommend button“, “Login button” , “Like Box” etc to your blogger blog. So, SUBSCRIBE to this blog now if you don’t want to miss them,even if I post them here, when you are not online.