One of my clients recently ran into a problem where they could no longer share folders on their machine! They had created shared folders on the same machine many time before, but for some reason now got the following error:
You folder can’t be shared.
They would get this message when right-clicking on a folder and choosing Share with and then one of the share options like shown below.
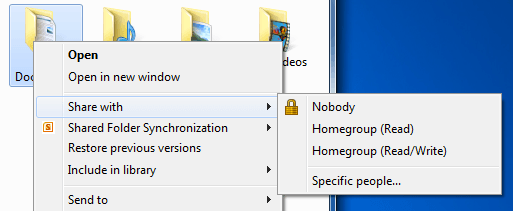
When choosing Homegroup (Read) or Homegroup (Read/Write), the error message would pop up! Pretty frustrating error message considering you might have been able to create a shared folder just a day before. Anyway, the solutions seems to be pretty straight-forward.
First, right-click on the folder and choose Properties instead of Share with. Then click on the Sharing tab and then click on the Advanced Sharing button.
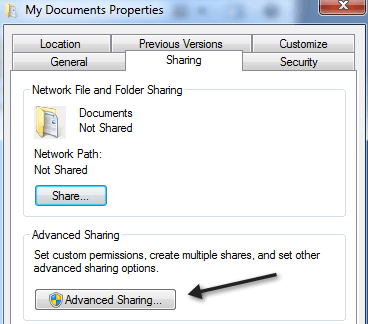
Go ahead and check the box Share this folder and give the share a name and choose your permissions.
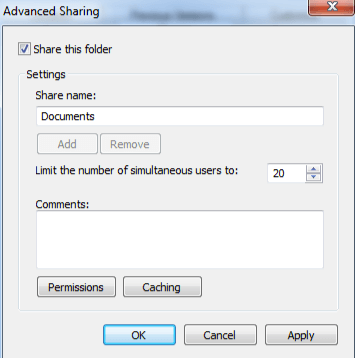
Click OK and hopefully you should be able to share the folder without getting any error messages. If you are still having problems sharing the folder, you may have another problem. Also, it’s still kind of annoying to have to share a folder in this manner since it’s pretty much a hack. The underlying cause could be a problem with your Windows services.
Click Start and type in services.msc in the search box. Press enter and then check the following services to make sure they are started and that they are set toStarted-Automatic.
- UPnP Device Host
- DNS Client
- DHCP Client
- Network Location Awareness
- Server
Once you have those services properly configured, restart your computer and see if you can share a folder normally. If that doesn’t solve your issue, you may have a permissions problem. In that case, you should take ownership of the folder first, then try to share it.
You can read a previous post I had written that is about TrustedInstaller, but describes the procedure to take ownership of a folder:
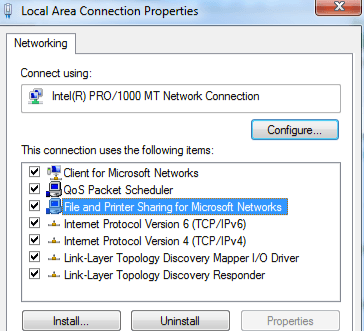
Once you have taken ownership, try to share again and see if it works. Finally, you also need to make sure that File and Printer Sharing is turned on for your current network connection. You can do this by going to Control Panel, Network and Sharing Center. Click on the current connection:

Next, a status dialog will pop up. Go ahead and click on Properties.
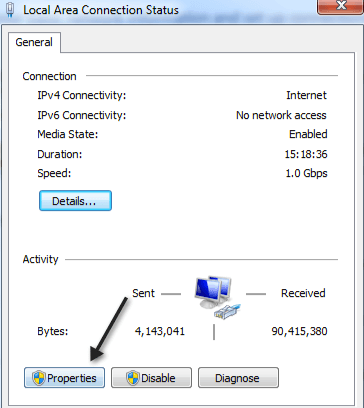
Finally, make sure File and Printer Sharing for Microsoft Networks is checked.
At this point, you should be good to go! If not, do you have VMWare installed on your computer? If so, the virtual machine adapter can cause problems with the real network adapter. To fix it, you should disable the VMWare virtual machine adapter and then see if you get the error message or not.
If you’re still having problems, post a comment here and I’ll see if I can help! Enjoy!
